Tuesday, October 27, 2009

Deal of the Week #4

Item Page Description Regular Price Special Price
116213 175 Pirate Party Kit $15.95 $9.99
116214 174 Princess Party Kit $15.95 $9.99


Sunday, October 25, 2009

Wanted

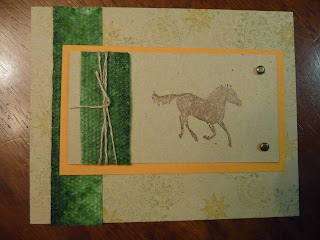
Stamp Set: Wanted
Cardstock: Naturals White, More Mustard
Ink: Garden Green, More Mustard, Chocolate Chip
Accessories: Paper towel, Hemp, Antique Brass Vintage Brads, Water bottle, Clear embossing powder, Heat tool

This is another technique we learned at the Wichita 1/2 day regional. It is called Faux Animal Skin. You will need paper towels to do this technique, the bumpy kind not smooth. Ink up your piece of paper towel with preferred color (I used Garden Green) spray with water bottle put clear embossing powder over the top, squish down into bumpy spots to ensure coverage. Heat. This allows the paper towel feel almost like snake skin. Great for animal, nature, or masculine projects.

Saturday, October 24, 2009

Modified Wax Paper Best Wishes & More


Stamp Set: Best Wishes & More

Ink: Rich Razzleberry

Cardstock: Pale Plum, Whisper White, Rich Razzleberry, Glossy White

Accessories: Wax Paper, Finial Press Textured Impressions Embossing Folder, Big Shot, Iron, tissue


This card uses a technique that is a modified version of the wax paper technique. With this technique you take a piece of wax paper cut down to the size of your Textured Impressions Embossing Folder. Instead of using cardstock through the embossing folder, use the wax paper...it will not be a "clean" impression as with cardstock but more of a "weathered" look. You then take glossy cardstock, place the wax paper (raised impression facing the glossy side) and a piece of computer paper over the top of that, iron a few seconds with iron set on no steam cotton setting. After ironing, peel off the wax paper from the glossy cardstock, you will see a slight impression left on your cardstock. Brayer any color you wish over the glossy cardstock to the intensity you wish. Take a tissue or paper towel, wipe off any extra ink, this will also take off any remaining wax residue, showing the white glossy beneath. Awesome looking background technique.

Friday, October 23, 2009

Weathered Patterned Pines

In the next few days I will be posting cards that were done at my last class. These cards were all inspired by techniques that were shown to us at the Wichita 1/2 day regional.

This card shows how to do a weathered technique using the Finial Press Textured Impressions Embossing Folder and Designer Series Paper. This technique will only work using the DSP because it has a white core, our regular cardstock is color straight through and for this technique you need to have paper that has the white core. After embossing the DSP paper with the Big Shot, take our sanding blocks and lightly sand the raised embossed image. This will take off the top layer and this inturn gives it the weathered look. Upon sanding it also gives the paper a soft feeling just like the new Christmas Cocoa flocked paper.

Stamps: Pattern Pines (Holiday Mini)
Cardstock: Whisper White, Garden Green, Christmas Cocoa Specialty Paper
Accessories: Real Red, Garden Green Stampin' Write Markers, Finial Press Textured Impressions Embossing Folder, Sanding Blocks, Big Shot

Thursday, October 22, 2009

Stampin' Up! Wichita 1/2 Day Regional

A few weeks ago I attended the Stampin' Up! 1/2 day regional here in Wichita. Any event that Stampin' Up! puts on is always top notch....full of great information, wonderful presenters and of course awesome projects. Along with most SU! events, the demonstrators are known for the swapping and this event was no different. Below are the swaps that I made to swap with other demonstators.


I used the new Sweet Treat Cups from the Holiday Mini Catalog for this wedding favor. Also used is the Bride Speciality paper, Wedding Sweet stamp set, Basic Black cardstock, Basic Black Grosgrain Ribbon, Jet Black StazOn Ink Pad, and Pretties Kit.

Cardstock: Real Red, Whisper White, Soft Suede, Christmas Cocoa Specialty Paper (Holiday Mini)
Stamps: Dasher
Ink: Real Red
Accessories: Real Red Grosgrain, Big Shot, Backgrounds I Texturz Plate, Champagne Mist Shimmer Paint, and sponge dauber, Scallop Edge Punch

I know it is hard to see as I don't have a close up picture but I ran the Real Red Cardstock through the Big Shot with the Backgrounds I Texture Plate. After stamping Dasher in Real Red, I took a sponge dauber with Champagne Mist Shimmer paint to the stamp and then stamped with both on the Whisper White. This adds such a neat effect and just a subtle shimmer...very pretty!


Cardstock: Green Galore, Basic Black, Whistper White

Stamps: Eat, Drink, and Be Scary

Ink: Only Orange Basic Black

Accessories: Crimper, Halloween pencils


Tuesday, October 20, 2009

Deal of the Week #3

The third Deal of the Week runs from October 19 through October 26

Item Page Description Regular Price Special Price
114348 179 Basic Jumbo grommets $6.95 $4.49
109857 179 Mini Library clips $12.95 $8.99
112571 179 Circle Designer brads $5.95 $3.99
112581 179 1/2" Library clips $6.95 $3.99

Monday, October 12, 2009

Deal of the Week #2

Another Stampin' Up! Deal of the Week
From today October 12th thru October 19th

Perfect Setting Bigz XL die
Item number
115961


Page 200
regular price $42.95
sale price $25.99


Flower Burst Embosslits die
Item number 114515

Page number 195
regular price $11.95
sale price $5.99


Pop-Up Three Tier Bigz XL die
Item number
116760
Page number 201
regular price $39.95
sale price $25.49


Monday, October 5, 2009

MDS - Always

This card was created using the My Digital Studio (MDS) program and the Always stamp set images. Once you figure out this program, it takes just minutes to create something. How awesome is that!


Thursday, October 1, 2009

My Digital Studio


My Digital Studio #118108 is available starting today ( October 1, 2009 ), also starting today you can get My Digital Studio for 50% off with a $400.00 (before S&H and tax) workshop/personal order.

You must call me or Email me your order to qualify for this promotion since I am required to place this order for you. Online orders reaching the required amount will NOT qualify.

Not only will you qualify for the My Digital Studio at 50% off BUT you will also get Hostess rewards of FREE money to spend and Hostess ONLY items which can be (2) level 1 Items OR (1) level 1 + (1) level 2 Hostess ONLY item

NOTE: My blog header, and in upcoming days, blog buttons are all created with the My Digital Studio. I am having so much fun using this program and can't wait to show you other projects using this program. Awesome investment for your crafting projects!

Deal of the Week

Weekly, thru the month of October there will be select product at least 25% off.

This week's products are:


5-Petal Flower Punch
Regular Price: $17.72
Preferred Price: $15.95


My Way Punch
Regular Price: $17.72
Preferred Price: $15.95


Trio Flower Punch
Regular Price: $17.72
Preferred Price: $15.95


Friday, September 4, 2009

UNDER CONSTRUCTION

Yes, I know I have neglected my blog and ultimately those of you who were coming to my blog.
Stay tuned.....I will be back on track soon and with a bit of a new look....Come back!

Sunday, May 3, 2009

May Scrapbooking Project of the Month

This super sunny scrapbook page is so simple to make with Stampin’ Up!’s Sunshine Garden Simply Scrappin’ Kit.
SUPPLIES
Old Olive Stampin' Write Marker
Sunshine Garden Simply Scrappin' Kit
Apricot Appeal 1/4 Inch Grosgrain Ribbon
Button Bouquet
Stampin' Dimensionals


May is National Scrapbooking Month

Stampin' Up! is offering a few specials for National Scrapbooking Month (May 1- 31):


A deal on Designer Series Paper (Buy 3 get one FREE)


A 20% discount on a brand NEW alphabet set (this is a SNEAK PEAK, only available in July in the NEW 09/10 Idea Book and Catalog


Scrapbooking Starter Kit - $75


Contact me for more information on any or all of these specials

Thursday, April 2, 2009

Scallop Envelope Easter Basket

I have seen many people making these Easter baskets using the Scallop Envelope die for the Big Shot and decided I had to try this myself. It was so EASY and QUICK. Below are the steps for making your own.
First, using your Big Shot, cut out 6 Scallop Envelopes. Attach the side tabs together as shown above, with Sticky Strip.


Next, take your remaining ends and attach them together to make your basket whole.

You will now have a hole in the bottom and will need to "patch" it with another piece of cardstock. I made mine square.


I cut a 1"x11" piece of cardstock and punched the sides with the new Eyelet Border punch to make the handle. Attached it with sticky strip also.


I added Delicate Dots DSP (SAB) to each side and on the handle for another festive effect.


Saturday, March 28, 2009

Snow, Snow, and More Snow

This is what we woke up to today. Kansas is getting hit with a blizzard, sleet, snow, ice storm. Wichita faired far better then what western Kansas has gotten but this is so NOT the weather for us at the end of March...Last week it was mid-70's!

Thursday, March 26, 2009

Polka Dot Punches


This card has a fun little twist/technique that is kind of hard to see in the picture but it is just enough to add "something" to an other wise simple card. There is no name for this little twist but I guess you can call it "add a little bling". As you can see from the picture, the center of the flower is a brad. This isn't just any brad...I have taken a mini glue dot and formed it to the top of the brad and then dipped in into SU's Fine Cosmo Celery Glitter. Once the glitter has stuck to the glue dot, tap off any extra and add the bling to your project.

Stamps: Polka Dot Punches (SAB), Sincere Salutations
Card Stock: Bashful Blue, Certainly Celery, Delicate Dots DSP (SAB), So Saffon, and Whisper White
Ink: Bashful Blue and Certainly Celery
Accessories: Silver Brads, Mini Glue Dots, Fine Cosmo Celery Glitter, 1/16" hand held punch

Tuesday, March 24, 2009

Botanical Blooms

This card features the Faux Film Strip technique and also uses the Texturz Backgrounds I plates.


To get the look of the film strip I stamped the Botanical Blooms images onto punched 1-1/4" squares and attached to Basic Black card stock that has been punched using the Spiral punch down both sides of the card stock.


(in this close up, I tried to show the texture on the card stock that was done using the Stampin' Up! Backgrounds I Texturz plate)


Stamps: Botanical Blooms (SAB)
Card stock: Bordering Blue, Regal Rose, Basic Black, and Whisper White
Ink: Bordering Blue, Pacific Point, Kiwi Kiss, Always Artichoke, Regal Rose, and Pink Piroutte
Accessories: Backgrounds I texturz plate, spiral punch, 1-1/4" square punch

Sunday, March 22, 2009

Thoughts and Prayers

This is another of my new favorites.
On this card, I used the new stamp set Thoughts and Prayers and our new texture plates (Gotta LOVE these) I inked the tree using Sage Shadow and Chocolate Chip Stampin' Write markers on Sahara Sand card stock. I tied Sage Shadow 1/4" Grograin Ribbon around that and attached it to Chocolate Chip card stock that I had run through the Big Shot with the Stampin' Up! Backgrounds I Texturz plates. I finished the card by adhering to another layer of Sage Shadow card stock.
The new texturz plates are a great way to add dimention to your projects in one easy step. Don't forget you can get your Big Shot starter kit now and reap all of the extra benefits from Sale-a-Bration.

Friday, March 20, 2009

5th Avenue Floral

Fifth Avenue Floral is one of my new favorite stamp sets in the new Spring-Summer 2009 Idea Book and Catalog. This stamp set just has so many elegant options for projects. This project highlights the crayon resist technique.

I stamped the flower images in Baja Breeze, Riding Hood Red, and So Saffron on glossy white card stock. I used a white crayon in areas that I wanted to highlight (white image) in the flower. I then sponged Baja Breeze, Riding Hood Red and So Saffron on the coordinating colored flowers and the area around them. Next, I took a tissue and lightly rubbed over the card stock. The ink will not stay on the crayon areas and will reveal the highlighted areas when the area is rubbed. To finish off this card, I tied 1" Double Stitched Baja Breeze Grosgrain ribbon at the bottom and mounted the glossy card stock to Baja Breeze card stock.
This is such a quick and easy technique that adds a wonderful effect to your projects.

Monday, March 16, 2009

3 Easy Payment Plan

On Saturday, Stampin' Up! announced a great new way to become a demonstrator...
The 3 Easy Payment Plan!

Fabulous idea if you ask me, since we are all feeling the crunch of the lovely economic times and REALLY NEED our discount on our stamping supplies!!!

This limited time offer allows you to make a partial initial payment and still receive the Starter Kit right away. Read about the Starter Kit here (including details on how to join)


3 PAYMENT DETAIL:
Payment #1 (charged when you order) - $56.34 (+ sales tax)
Payment #2 (charged April 15) - $56.33
Payment #3 (charged May 15) -$56.33


JOIN BEFORE MARCH 31 AND YOU WILL:
Save 15% OFF the Starter Kit (regular price is $199)
Choose a FREE stamp set - valued up to $47.95
SIGN UP IS EASY:
Start by printing the order form and customize your started kit.
Fill out the
3 Easy Payment form
Contact me -paperwork must be mailed to Stampin' Up!.
You cannot join online if you want to take advantage of the payment plan.

It's the perfect time to be a Stampin' Up! Demonstrator!
You can simply enjoy the discount for yourself or start a club by stamping with a few friends each month or make it a full time business.
In my 9 years as a demonstrator, I have never had a day where I hated my boss or worried about getting laid off

Do I look like I'm having fun??? I truly LOVE what I do!
I would love to have you join my Stampin' Team!

If you have any questions please e-mail me. I'm here to help you benefit from doing what you already LOVE!
Now back to stamping!

Thursday, March 5, 2009

Scrapbooking Project of the Month

Click HERE to view details on this Scrapbooking Project of the Month provided by Stampin' Up!

Card of the Month


Click HERE for details on this March Card Project of the Month provided by Stampin' Up!

Friday, February 27, 2009

Welcome Frame

A teacher at school got married last weekend and I made this welcome frame for her, for her new home. I won't go into much detail as it has a combination of retired and current Stampin' Up! elements but these frames are fun and easy to do and are great gifts for just about anyone or a fun project for yourself. I also want to shout out a "Thank You" to Lori who made it possible for me to complete this project (supplied me with the frame)

Thursday, February 26, 2009

Big Shot-Petal Card Hanging Pounch

I finally downloaded my camera with previous projects that were on there.

This is a hanging pouch that I made for teachers and staff at school and church that I just wanted to wish a Happy Valentine's Day to.


This hanging pouch is made using the Stampin' Up! Big Shot and the Petal Card Die (pg. 197 in the new Spring and Summer Idea Book and Catalog!
This little pouch is so incredibly quick and easy to put together:

Using your Big Shot, cut two of the Petal Cards. Fold up just two of the petals which will then form a heart shape. The two folded petals help to form the bottom of the pouch. Then, you cut a strip of cardstock 1 1/4" x 5 1/2" (the width can be made bigger if you'd like to put more in your pouch) Crease the bottom strip in half (at 2 3/4") and attach the strip to the folded petals to make your bottom of the pounch. I used Jumbo Eyelets and 1/4" Grosgrain ribbon for the handle. I used the Candy Lane DSP and the two new heart punches, Full Heart and Heart to Heart to decorate the outside.


Monday, February 16, 2009

Stampin' Up! Order


I had to take this picture of a recent order that came from the new Spring/Summer Idea Book and Catalog. I got a lot of new and fun items to play with. I have started playing with some of them and can't wait to show you those projects and also how to use some of these new products (can you say new Big Shot toys and punches) Not only did I get the stuff I ordered but I took advantage of Sale-a-bration and received a few FREE stamp sets.

Don't forget you too can take advantage of SAB.

See this post for more information and contact me today with your order!

Thursday, February 12, 2009

Heart to Heart

This is another Valentine's card that we did at a recent class. I still am not sure what I think about it, it was easy to produce but it just feels like it was missing something. I LOVE the new Heart to Heart punch though and love that you can get it across a card 3 times!
Stamp Sets: Love You Much
Paper: Rose Red, Pink Pirouette
Accessories: Heart to Heart punch, Scallop punch, 1-1/4 Circle punch, 1/16 Circle Handheld PunchWhite Gel Pen

Wednesday, February 11, 2009

Love You Much

A quick valentine.

Made this card with customers during the Love You Much promotion. This uses the new stamp set..Love You Much, Riding Hood Red, Chocolate Chip, and Pretty in Pink card stocks, the new Candy Lane DSP and Chocolate Chip grosgrain ribbon. To bring a bit of color to the word "love" I used the Aqua Painter and dragged the stamped color into the word. I also used one of the flowers from the Trio Flower Punch attached with a silver brad to add dimension.

Monday, February 9, 2009

Sweetest Stems

I am LOVING all of the new Big Shot Dies that are now available. This card uses one of the new embosslits. Sweetest Stems to be exact. What is awesome is the new Designer Series Paper Raspberry Tart that coordinates perfectly with this embosslit. I chose to do a tone on tone color in Kiwi Kiss for this card, very elegant. One thing I did change after I made this one, for my customers to make, was to change the white punched scalloped edge to Pretty in Pink. We liked that combination so much better, the colors complimented each other more.

Sunday, February 8, 2009

Elegant Thank You

This 4-1/4 x 4-1/4 card was made using one of our new "under $10" individual stamps (Elegant Thank You) that was released in the Spring/Summer 2009 Idea Book and Catalog. Get your new catalog now and see what other exciting items are now available.
Stamps: Elegant Thank You, Pretty Petals
Ink: Whisper White Craft Ink, Baja Breeze
Paper: Baja Breeze, Not Quite Navy, Whisper White
Accessories: Scallop Square Punch, Baja Breeze 1" Double-Stitched Grograin Ribbon, Not Quite Navy Stampin' Write

Thursday, February 5, 2009

Designer Series Paper Embossing

This is a very quick and easy technique (again from my December technique class. To add dimension to your projects emboss over your designer series paper. In this project I used white embossing powder over Frosty Days DSP. Again, this adds dimention to your projects w/o adding a lot of extras.
Stamps: Best Wishes and More
Ink: Versamark
Paper: Frosty Days DSP (Holiday Mini-now discontinued), Tangerine Tango
Accessories: White Embossing Powder, Tag and Sm. Tag punches, Tangerine Tango 5/8" Striped Grosgrain Ribbon

Wednesday, February 4, 2009

Faux Quilting

Yet another technique card from my December class. This is faux quilting.
Directions: Punch out 6 squares of patterned paper. Cut one square in half diagonally & then cut it in half again. Adhere 1 square in the corner of another color of contrasting card stock. Add a quarter square piece on both sides of the square piece. Continue in a square until you have a quilt. Add the center square & optional embellishements in and/or around the edges.
Stamps: Wonderful Words (FW 08 Discontinued)
Ink: Always Artichoke
Paper: Juentos DSP, Really Rust, Always Artichoke
Accessories: Boho Blossoms Punch, Rich Regal Brads

Tuesday, February 3, 2009

Round Tab Punch Circle


This card was another project that was demo'd at my December technique class. The Celebrate You was punched with the 1-3/4" circle punch and the outer layer was made using the Round Tab Punch in a 3x3 piece of cardstock. Insert the 3"x3"cardstock all the way into the round tab punch, being careful that it’s also centered from one side to the other, and punch. Turn the cardstock 90 degrees, viewing your punch upside down to line up with the corner edges of the previous punch, and punch again. This will give you the next size up circle for an outer layer. (You can now get this effect using the new CircleScissor Plus...pg 188 in SS09 catalog)


Stamps: Party Hardy

Ink: Tangerine Tango

Paper: Frosty Days DSP (now disc. Holiday Mini), Tangerine Tango, Kiwi Kiss, Chocolate Chip

Accessories: Round Tab Punch, 1-3/4" Punch